No Budget Cinematography | Tips From the Co-Director of Cosmos
My name is Zander Weaver, I’m 28, and alongside my brother, Elliot, I’ve just spent the last 5 years directing and producing my debut feature film – a sci-fi adventure called Cosmos.
Cosmos had zero budget. That is to say we had no budget set aside, no outside financial support. We did spend money on the film of course, between £5k-6k. That included buying some gear, food, petrol and paying for electricity at a location but that expenditure for a feature film is both incredibly low and was completely out of our own pockets. Some short films have budgets of £30k+. So to make a 2 hour movie with a fraction of that, by film industry definition, is a “no budget film”.
So how did we do it? We made the film with limited gear, a small cast and three crew. We wrote a story we knew we could achieve with what we had and we undertook every key crew role during the production with the exception of writing the score. And we learnt a hell of a lot along the way, I’m hoping to share with you some of those lessons, tricks and tips we picked up, and hopefully give you some inspiration for your own ideas.
Before we get going, here’s the result, the trailer for Cosmos.

And here’s a quick featurette where Elliot and I explain why and how we made a movie this way.
We did almost everything on this movie and we could talk about each and every step in detail, but in this blog I’ll focus purely on cinematography for a no budget movie. Perhaps if people enjoy this content we can dig into other disciplines in future articles. I’ll discuss camera choice, rig building, slider solutions and even offer some quick tips that will hopefully help your lighting. Remember, all of what you’re about to see, was achieved with the bare minimum. Let’s get going!
Cinematography
In a tight space, everyone can hear you scream.
We knew going into the project that our options would be somewhat limited. Cosmos is set predominantly inside a car, the three characters interact and bounce off each other from their work stations and we wanted the audience to feel like they were a part of that, to feel as if they were inside the car with the characters.
The easy option would have been to open windows, pop a long lens on the camera and shoot everything from outside the car – more space, easy to setup, easy to derig, but that would have felt distant.
Compare the following two screenshots from the film, the first is on a zoom lens through the open passenger window, the second is on a wide angle inside the car itself, about a foot or so away from the actor. Both angles serve a purpose but we wanted 90 per cent of the film to match the aesthetic of option 2; the more intimate, engaging angle.
To get the camera and equipment inside the car would be a challenge, but a challenge worth overcoming. It would pull the audience into the story and make them the fourth character in the vehicle.
With this decision made, we set about solving the problems it dug up. How much gear could we squeeze into the car? How big could the camera be? How would we secure the camera in place? How could we make shots interesting and compelling with little to no character and camera movement?
Camera
We very quickly settled on the BlackMagic Pocket Cinema Camera, (or BMPCC for short), we loved the image it produced and not only was it affordable (around £600 at the time) but importantly it was also very small (the body only just larger than a smartphone and about as thick as a box of matches).
This was the perfect match for our no-budget movie. Such a small, lightweight camera could comfortably squeeze into the confines of the car (turns out comfortable is not a word I’d ever associate with filming Cosmos, but it would fit and that’s a damn sight better than a camera as big as a rucksack!)
But this alone wouldn’t be suitable for 80 per cent of our filming requirements. We’d need an external monitor, we’d need to rig the camera to a tripod head or slider and we’d need to shoot handheld from time to time.
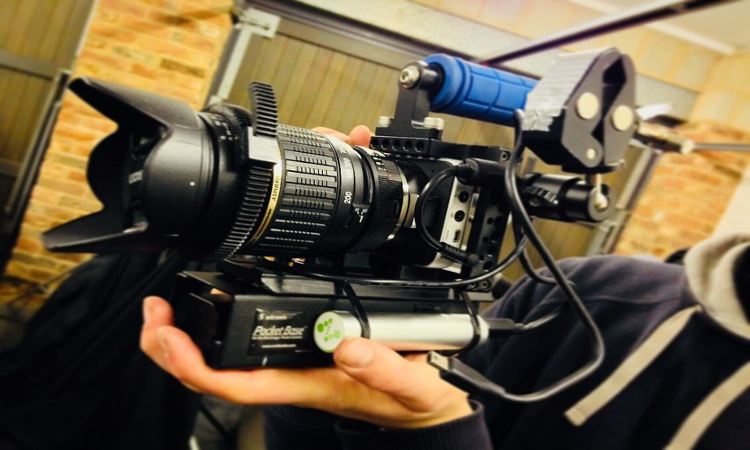
I searched the web for a rig that would fit our needs. We wanted something we could shoot handheld with, some form of shoulder support. But we also wanted to remove those supports in order to squeeze into the car. Anyone who’s ever looked at rigs online will know there are two types: stonkingly expensive ones that look like they’ve been precision milled out of some form of rare metal and dirt cheap ones that look like they might snap on first use. After a frustrating couple of hours research I decided to take matters into my own hands and make one (did I mention this film had zero money behind it?!)
I took some measurements, strolled to my local DIY store, picked up some off-cut MDF, copper piping and plumbing fixtures and strolled home. A bit of sawing, drilling and screwing later and we had what we needed. I made a detachable shoulder support, we added a monitor, a follow focus and a matte box and voila!
Granted it’s not the prettiest thing you’ve ever seen, but hey, it’s my baby and it never let us down across the entire shoot, it also cost about £5. Who needs posh, anodized, precision rigs anyway?!
Whilst the full rig was much larger than just the camera, it was still tiny compared to other cameras out there. Plus everything was detachable. If we couldn’t get in where we needed, we’d remove the matte box, reposition the monitor or take off the handle. Total customisation, total flexibility.
Slider
But getting the camera to fit in the car wasn’t enough. We wanted to make evolving shots. We wanted to block the actors in their seats and move the camera to keep the visuals enticing and exciting. So we bought ourselves a 1m Konova K3 slider. Even if we didn’t have space constraints there’s a heck of a lot you can achieve with 1m of tracking capability. I’m not talking about the purely aesthetic, aimless movement of the camera to make a shot feel more interesting. I’m talking about giving the camera a new dimension to move in, to allow you to reposition your shot during the take in a way that reveals something new or finds the audience in a new setup without ever needing to cut.
We’re massive Spielberg fans. In our opinion he’s the king of camera/actor blocking (I could wax lyrical about it). Larger set pieces aside, we found that many of the shots he creates are localised. A small push here or a reframe there opens up a new view or finds us over the shoulder of another character. Inspired by this we purchased our 1m slider and planned to do the very same (albeit not quite as proficiently as Mr. Spielberg!!).
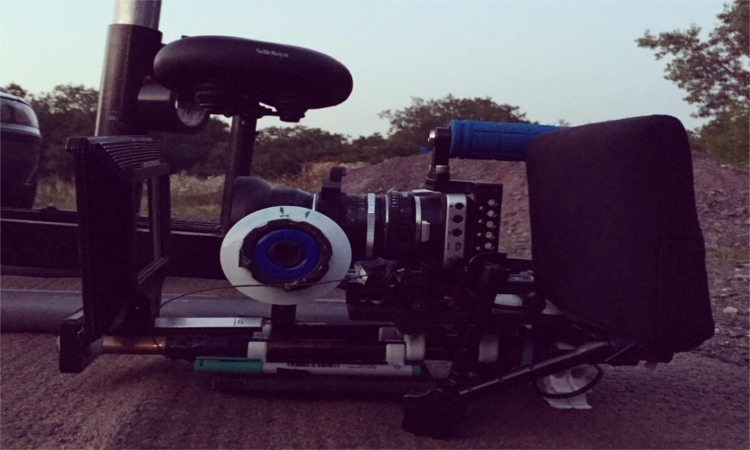
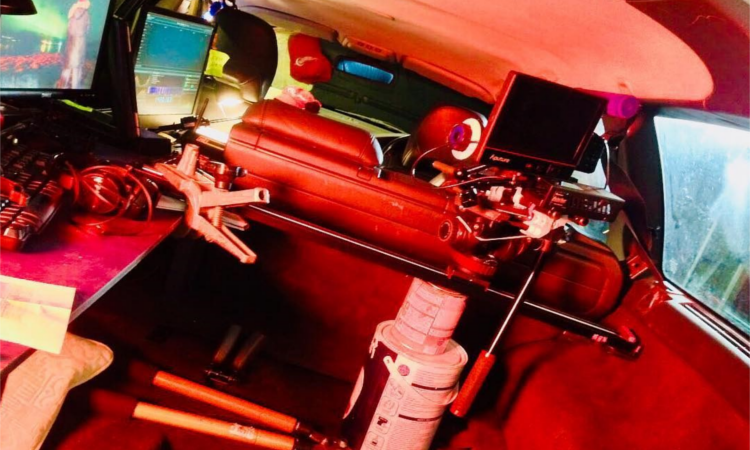
Here are a couple of examples of the slider in action and a glimpse behind the scenes showing the compact space we were working in.

The slider was used throughout the film and for me it’s an example of how a single piece of equipment can be incredibly versatile. When you have limited resources you find ways of making the most of what’s available and this was no exception. Not only did it allow us to move the camera but it also offered us a way to secure the camera deep within the car, a sort of mobile, compact tripod. We’d bolt it to the desks or a door handle, pop our camera on top and it’d allow us to get solid shots in spaces we’d struggle with otherwise. This itself required creativity and we’d often resort to utilising some spare paint pots that were being stored in the garage where we filmed, to help stabilise the setup.
Lighting
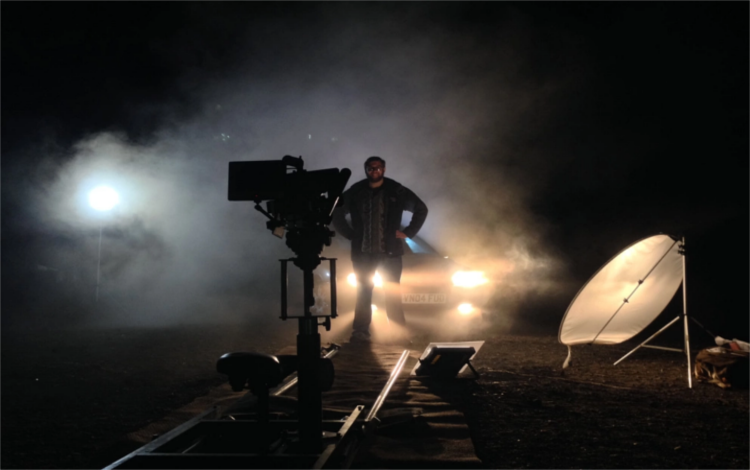
Our entire lighting kit on Cosmos consisted of 3 LED panel lights and a 2kW Blonde. The Blonde was used exclusively on night exteriors where we had a power supply (not often). We shot an entire forest night exterior with only 3 LED panel lights – so again, limited gear required us to think creatively. We’d bounce practical torchlight off a reflector or, when shooting around the car, use the headlights themselves to help fill out the space. More detail on our night lighting process can be found here.
Inside the car things were even more interesting. The LED’s were used exclusively for moonlight and brake lights, that is to say “exterior light” through windows. The entire interior of the car was lit completely practically or with supplementary “creative” solutions like iPads, phone torches and glow rods. This suited us perfectly, adjusting a lighting setup became a matter of switching desk lamps on and off or moving an iPad around. An actor not in frame might hold the iPad in the right position to light the shot for us and we used a simple app to select the coloured light we were looking for. Adjusting the screen brightness, we were sorted. All computer screen and ambient coloured light was achieved in this way.
Quick Tips for Lighting
Turn Lights Off
It sounds obvious. But start with a blank canvas. Build your light up and don’t be afraid after you think you’re sorted to turn one off to see what effect it’ll have on the scene. You’ll be amazed more often than not. It’ll give you a new option or at least make you question whether you need the light at all.
Less is More
We lit Cosmos almost entirely with 3 LED panel lights and a handful of practicals. Don’t fall into the trap of thinking you need a million lights setup to make something look cinematic. In fact, film lighting is an exercise in simplicity. Let the light do most of the work for you.
Don’t be Afraid of the Dark
Shadows are your friend, they provide sculpting, structure and contrast. If there’s something not quite right about your shot it’s probably a lack of shadows. So don’t be afraid to let darkness lurk throughout your image. Encourage shadows and pools of light.
Reverse Key Lighting
We’ve actually written an in depth article about this here but reverse key lighting is the single, quickest way to make your lighting more cinematic. A simplified explanation is to avoid setting your key up “camera side”, i.e. don’t use the key to light the side of the actor’s face that is closest to camera, always aim to light the plane of the face that is furthest away from camera. See examples below:
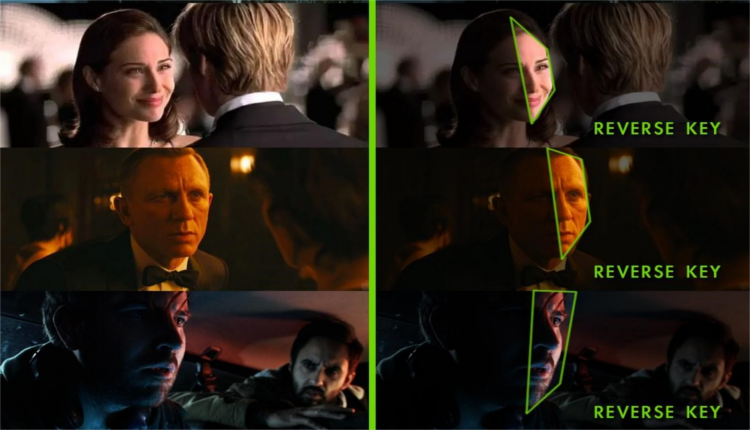
You’ll notice lighting from this side forms descriptive shadows, sculpting areas of light and dark that tell you more about the shape of your subject’s face. Keep an eye out for it in movies. You’ll see it all the time now. Lighting from camera side kills those shadows, and most of the time looks flat and uninteresting.
Smoke
Smoke is an amazing tool. A blast of smoke in the background adds depth, hides low production values, enhances lighting, creates contrast and just looks cool. Don’t forget you can dissipate the smoke into a mist and also fill interiors. Who doesn’t love atmosphere? Ridley Scott famously said the world of Blade Runner was wet, dark and smokey to hide the less impressive parts of the set, it worked for Ridley and it worked for us.
This article has really only scratched the surface of shooting Cosmos on no money. We utlised wheelchairs for long dolly shots, sucker mounted our BMPCC to our own car and choreographed a chase sequence through the public roads of our home town (all very safe of course!). We even managed to make use of a tea towel at one point for a push-in (towel on the table, camera on the towel and sliiiiide).
If you’ve read this far, thank you for sticking with me. I hope I’ve excited you or inspired you to get out there yourself and find creative solutions to your filmmaking problems. This message goes across the board and was employed on everything from VFX to casting, costume design and ADR. Making a movie without a budget or crew is not an easy task, but in today’s world, it’s within everyone’s reach. So good luck, keep going and I look forward to seeing what you create!
If you’d like to know more about Cosmos or how we made it, please don’t hesitate to contact us through our Facebook, Twitter or Instagram. We’d love to hear from you!