Where do Cartoons Come From? | The Process of 3D Animation
Animation has been around for decades. It has fuelled our imaginations and allowed us to journey into new and exciting worlds, escaping from our reality. What many people don’t realise, however, is the amount of work that goes into the creation of an animated film or episode. It takes a team of hard-working people a very long time to create the content that we see on screen. So today, let’s take a look at the animation pipeline and what goes into creating cartoons.
We will focus on the 3D pipeline, the process of creating three-dimension images in a digital environment. Traditionally with hand-drawn animation, the creators would draw each image frame by frame, before putting them all together to create a sequence. Now, with 3D animation, we no longer have to draw every single frame but we do have to create the sequence through computer programs. Here is the journey.
Step 1: Pre-Production
At this point, the writers of the story pitch their ideas, creating the concepts and themes for the animation. A script is produced as well as character design sheets that are created by a concept artist. Here we get our look and feel for the characters. A storyboard artist will draw out the various shots required for the scene so that the animator will be able to create it later. Often an animatic, or moving storyboard, is created to establish timing and shot lengths.
Step 2: Modelling
Next the character designs are handed over to a 3D Modeller. Using software such as Maya and Blender, the artist will model or sculpt a character from scratch, making sure not to make any errors in the character mesh. The mesh is all of the polygons that make up the character’s surface. These need to be accurate as they are essential for later stages.
Step 3: Texturing
Using programs such as Photoshop, textures are painted and created that are then wrapped around the mesh to create colour and textures. An artist can create a cartoony plastic look or even a photorealistic metal texture.
Step 4: Rigging
A rigger adds a skeletal structure to the character mesh. This will allow for the characters to move around. This artist creates constraints on joints so that arms bend realistically, feet lift properly and the spine does what it is supposed to. It is at this stage that a character’s eyes are also rigged allowing for our character to look around.
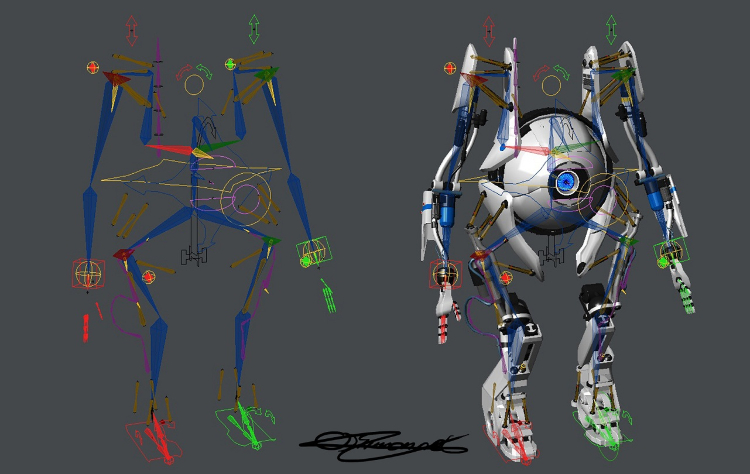
Step 5: Skinning and Blendshapes
Here the various joints of the skeletal structure are manipulated through a process called painting skin weights. It is here that joints are assigned values of influence so that when we start moving our character, the mesh moves accordingly. If we move the wrist joint, we don’t want the leg to move, and so it is during this stage that this is carefully corrected. Blendshapes are then made. These are basically character emotions or facial expressions that are created for ease of animating. Emotions are created so that at the click of a button the character can be sad or happy. Here is also where blendshapes are created for letters such as M, B and P. By doing this, it allows for the animators to combine them to create lip movement.
Step 6: Animation
We are finally at the animation stage. In the software, the animator manipulates the joints of the character and sets keyframes (animation points) so that the character can move. The animator needs to focus on a number of factors following the 12 principles of animation. These include staging, the position of the characters in relation to the environment (which is also modelled by the environment design team) and timing, which is very important for fluidity of motion.
Step 7: Rendering
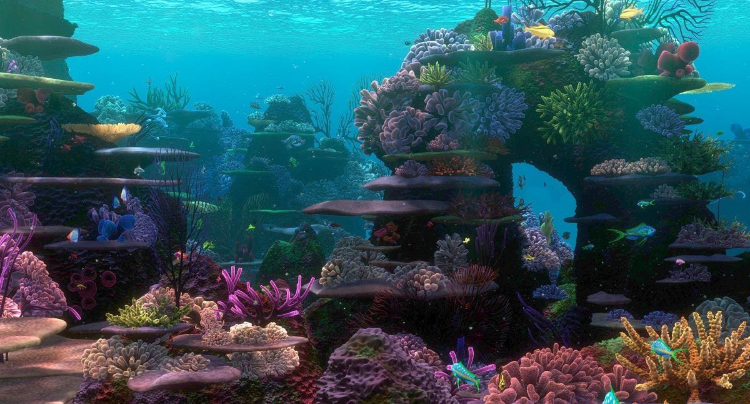
Phew, we did it. We have an animation. That’s it… oh, it isn’t? Rendering. Having lit our scenes with virtual lights, the process of creating our final frames begins. This process is where all of the textures and lights are baked into an image, usually 1080p, and fired out the other end. This process can take days, even weeks to produce each rendered image, frame by frame, depending on the complexity of the shot. To put into perspective, it took Pixar four days on average to render each frame of Finding Nemo due to the complexity of its underwater scenes. You need a lot of computers working simultaneously to speed up the process!
Step 8: Post-Production
Here all the frames are edited together along with the sound effects, voice overs and titles and credits. We now have a finished story. The editing process takes place and the video is piped out. Congratulations, you have a finished 3D animated film!
What? You worked 3 months, alone, and you only have a four-minute film? That’s how long it takes to animate! Imagine that on a larger scale with a team. It takes a long time and is not for the impatient.
This is just 3D animation. There is motion capture, Claymation and so much more that the animation world has to offer, it really is a complex art. People do it, though, to bring us joy, to send a message or share their stories. That is animation. That’s where cartoons come from. So, next time, when you watch an animated film or series, look at the credits at the end and see just how many people worked to create it. You might be shocked at how many there are.